


About Slide Numbering

There are three options for slide numbering

Sequential

  • Slides are consecutively numbered from 1 to X.

  • This is the default method of slide numbering. 

  • If you insert new slide blocks in between existing slide blocks, click Update All Fields in the Controls group on the LGPro ribbon to update the slide numbering.

Absolute

  • Slides are numbered to represent the actual slide numbers as they are in their source PowerPoint file.

Restart by Module

  • Slides are numbered to begin at 1 and continue sequentially, within each Module.

  • Helpful when each of the Modules in your course have unique slide decks supporting them.

No matter which slide numbering option you choose ...

The Slide Number always sits above the icon or thumbnail in column 1 of the PPT Slide block.

Slide Block example

How to Change Your Slide Numbering Preference

Step 1:

Click Parts on the LGPro ribbon

To get started:
  • Click Parts in the Customize group on the LGPro ribbon

  • Click LeaderGuide Pro Preferences in the drop-down menu

  • This will open the LGPro Preferences wizard
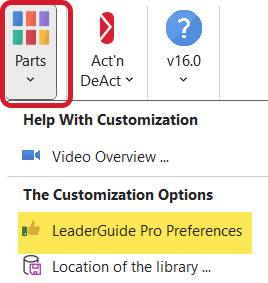
Parts and Preferences on drop down menu on LeaderGuide Pro ribbon


Step 2:

Use the Preferences wizard 

To change your preference:
  • Select the Preference you need in the Preferences dialog box 
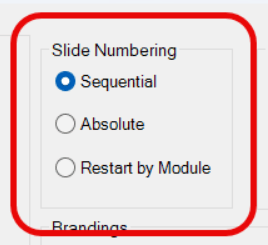
Preferences - Slide Numbering small

Step 3:

Apply your Change

To apply your change:
  • Click OK in the lower right corner of the Preferences wizard
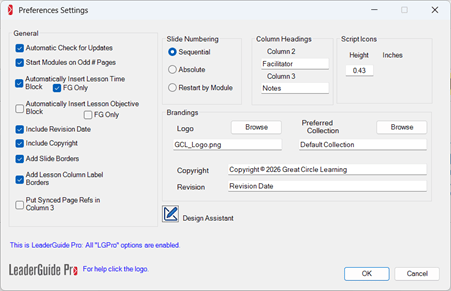
  • Click Close in the lower right corner of the Preferences wizard 

Preferences Wizard small
  • Your new Preference will apply to all new guidebooks you create

  • Your new Preference will NOT affect existing guidebooks


To Update Slide Numbers


To update slide numbering:

If you add PPT Blocks from the LGPro ribbon, or if you delete or reorder PPT Blocks:

  • Click Update All Fields in the Controls group on the LGPro ribbon
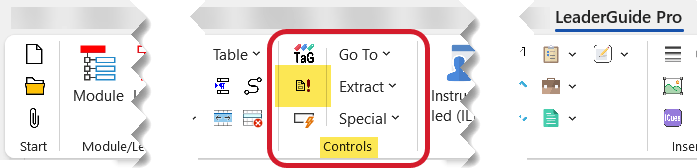
Update All Fields on LeaderGuide Pro ribbon


Do NOT manually adjust the slide numbers

  • Manually changing the slide numbers will interfere with the automated LeaderGuide Pro Update All Fields function for those PPT Blocks.

Because this will negatively impact LGPro functionality, please do not:

  • Delete the Slide Numbers added by LeaderGuide Pro

  • Manually edit the Slide Numbers added by LeaderGuide Pro

To recover the Slide Numbering functionality

If someone accidentally removes or manually changes a slide number added by LeaderGuide Pro:

  • Place your cursor in the trouble PPT block

  • Click Instructor-led (ILT) in the Content Blocks group on the LGPro ribbon

  • Click PPT Slide in the drop-down menu to insert a new PPT block below the existing troubled PPT block

  • Pull the slide image down into the new PPT block

  • Place your cursor back in the trouble PPT block

  • Click Delete Table Row in the Text/Table Formatting group on the LGPro ribbon

  • Click Update All Fields in the Controls group on the LGPro ribbon

Keep in Mind

Colleagues reviewing or editing your file will not know what you know.

When sharing a LeaderGuide Pro file with those who do not know how to use LeaderGuide Pro:

  • Keep a master copy of the file

  • Share only a copy of the master file

  • This way you can more quickly recover from errors that might be made inadvertently by non-LeaderGuide Pro users. 

Create a test facilitator guide with a few slides to get used to working with slides.

Create a small PowerPoint file with 6 - 10 slides.

  • Put a lot of text on one or two slides.

  • Include slide notes.

Use this PTT file to practice with and learn how to work with slides.

  • This will save time and eliminate headaches.

  • And it will help you create training materials that are easy to maintain and update.