
Basics
How to Start a New Guidebook with LeaderGuide Pro
Either a Facilitator Guide or a Participant Guide

1. Open Microsoft Word to Access LeaderGuide Pro
-
Open Word and place a Blank new document on the screen
-
Click on LeaderGuide Pro along the top of the Word ribbon
-
Click on New on the LeaderGuide Pro ribbon

2. This will launch the Start a New Guidebook wizard
-
Use the wizard to set up your new guidebook
-
Click OK to create & Take your hand off your mouse

|
Do not do anything else on your computer while this is happening. You will see your new guidebook begin to build. |
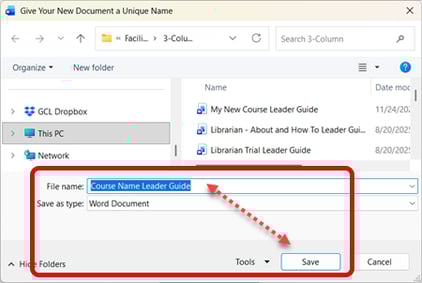
3. You will be prompted to SAVE your new Guidebook
-
Edit the File Name if needed
-
Click Save
-
Hand off your mouse as LeaderGuide Pro continues to build your new guidebook
|
FYI: To Save, you will be taken to your LeaderGuide Pro Local Library folder in the local Documents area on your computer. TIP: We recommend saving to this location because:
|
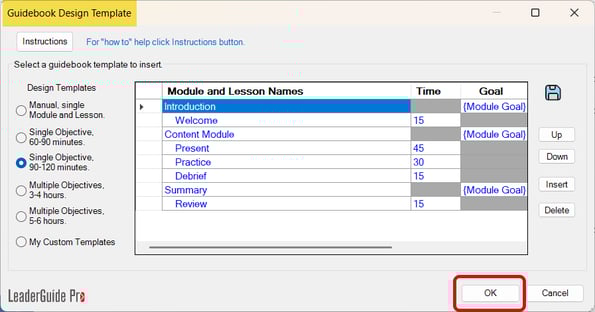
4. Add your initial course outline using the Guidebook Design Template
-
Select an outline structure
-
Edit the Module and Lesson names & re-order as needed
-
Click OK to add your initial outline into your new facilitator guide
-
Hand off mouse as your document continues to build
|
FYI: Once your new guidebook is set up, you can: Edit, Add, Reorder and Delete Modules and Lessons as needed. |
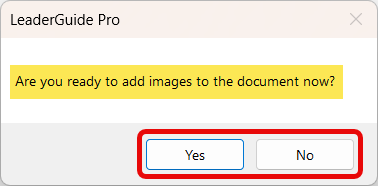
5. You will be given the option to add PowerPoint slides and notes
-
Select Yes if you are ready or No if you are not
-
If you select Yes - Follow the prompts to import your PowerPoint file
-
Hand off mouse as your document continues to build.
| TIP: You can import PowerPoint at any time as you build your guidebook. |
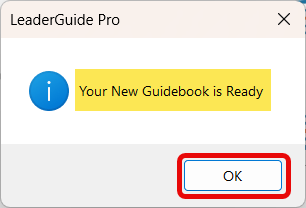
6. After the final touches are in place you will see this message
-
Click OK
-
Your new LeaderGuide Pro Facilitator Guide or Participant Guide is now ready for you to start adding content.
Learn About
- The Start a New Guidebook wizard
- The Guidebook Design Template wizard
- Importing PowerPoint
Next Steps
- Get to Know Your New Guidebook
- Add Module information
- Add Lesson Content