Overview
LeaderGuide Pro is highly customizable to make it easy to produce branded facilitator guides and participant guides
- 22 Preference options are easily made with a mouse click!
- Once set, your preferences automatically apply - saving you time and ensuring consistency
- And of course your preferences are just as easy to update
Many additional customizations can be made, with a bit more effort and a solid understanding of both LeaderGuide Pro and Word
- use our Knowledge Base and Courses to learn more
- and feel free to contact Great Circle Learning for assistance
Easy Preferences to Set

Use the Preferences Wizard
-
Click the Parts button on the LeaderGuide Pro ribbon to open the Preferences Wizard

-
Click Parts to open a drop-down menu
-
Select LeaderGuide Pro Preferences to open the Preferences Wizard

The Preferences Wizard Explained
There are six sets of Preferences options available to you on the Preferences Wizard
The preferences you set will apply to NEW guidebooks that you create - they will not impact existing guidebooks
You can change your preferences at any time, as needed
⭐ #1 General Preferences

|
|
⭐ #2 Slide Numbering

Restart by Module
|
Sequential
Absolute Use Absolute if ...
|
⚠️ Do Not Manually Alter the Slide Numbers inserted by LGPro
-
Manually changing the slide numbers will remove the automatic numbering functionality that LeaderGuide Pro provides, resulting in A LOT more work for you because you will then have to renumber every slide yourself.
⭐ #3 Column Headings

 |
Column Headings
|
⭐ #4 Script Icons

Script Icons These are smaller, optional, Instructional Cue icons that you can insert into columns 2 or 3 of the Content Blocks on your Lesson pages
If you change the ICue icon height to less than 0.25 inches (0.635 cm)
|


|
⚠️ Do Not Insert ICues into Column 1
-
Column 1 in your Facilitator Guides and Participant Guides is EXCLUSIVELY reserved for use by LeaderGuide Pro
- Column 1 holds:
- Content Block Icons - inserted by clicking Content Blocks on the LGPro ribbon
- Slide Number references - when slides are imported
- Synced Participant Guide page number references - when guidebooks are synced for page numbers
⭐ #5 Brandings

Logo
-
Your logo will appear on the cover page of the Guidebooks you create
- Until you make this change, every Cover page has a logo placeholder showing the Great Circle Learning logo
- This spot on a Cover page carries the LGP Style name: zLGP CoverPage Graphic
- If this Style Name is removed, then LeaderGuide Pro will not be able to insert YOUR logo into that spot
-
Use the Browse button to navigate to and select your logo file
- Your logo will insert on new Guidebooks you create, replacing the Great Circle Learning logo
-
This setting allows you to set a preferred Collection that will automatically be used for the Guidebooks you create - unless you opt to use a Custom Collection as you are using the Start a New Guidebook wizard
-
A Collection is a master set of document parts, icons, styles and various other controls that determine the look and feel of your finished Guidebooks
-
-
Use the Browse button to navigate to the Collections and select the one you prefer
- If you need to change the Collection in use in a Guidebook you have created:
- Click ATTACH on the LGPro ribbon and select the Collection you need
- LeaderGuide Pro will update everything but the Cover page and any changes you may have made to the Introductory Materials section
- For the change to include the Cover page and Introductory Materials section, run an Extract
Copyright
-
Your copyright will appear on the Acknowledgements page (the inside front cover) of each Guidebook and will repeat in the footer on the odd numbered pages
-
Enter your copyright as it is to be listed
-
While running in free trial evaluation mode, the Great Circle Learning copyright is automatically inserted
Revision
-
Your Revision Date will appear on the Acknowledgements page (the inside front cover) of each Guidebook and will repeat in the footer on the odd numbered pages
- You can customize the stem of the revision label here
- For example, instead of “Revision Date:” you could edit it to
- Rev. #: or
- Revised On:
- or to anything you wish to use
- The actual date inserted will be the current day's date - the day you create your new Guidebook
- To update the date
- Manually edit the date on the Acknowledgments page
- Then click Update All Fields on the LeaderGuide Pro ribbon to reflect the edit in the page footers
⭐ #6 Design Assistant

|

|
|
AUTO OPEN NAVIGATION PANE
|

|
|
AUTO OPEN ICUES PANE
|
|
|
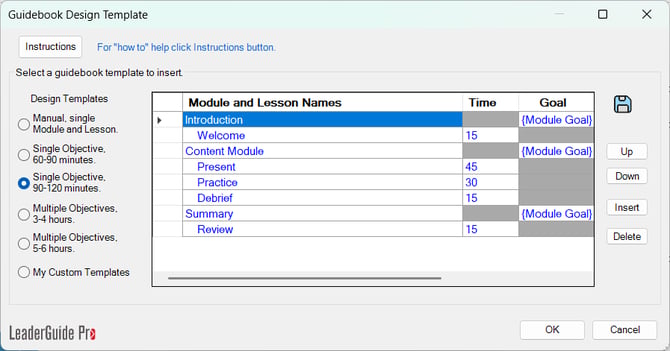
GUIDEBOOK DESIGN TEMPLATE
The Guidebook Design Template provides:
|
If you choose to disable this option:
|
|
MODULE AND LESSON ASSISTANT As you add a New Module into your guidebook, this option allows you to also add:
This can save a great deal of time |
 |
|
HIGHLIGHTED CONTENT BLOCK PROMPTS
|

|
|
HIGHLIGHTED ICUE PROMPTS
|

|