Overview
A LeaderGuide Pro Participant Guide is designed to serve learners in two ways:
-
To support learning and engagement during the training session
-
To serve as a post-training resource
📍TIP: A Facilitator Guide can be Extracted from a Participant Guide
Even though it is a best practice to build a Facilitator Guide first and then extract a Participant Guide...
LeaderGuide Pro allows you to extract any type of new guidebook from an existing one. This allows you to:
- Sync content updates from one guidebook to the other
- Insert Participant Guide Page References into the Facilitator Guide
Standard Participant Guide Structure
Section 1 Section 2: Preparation Section 3: Learning
Optional Section 4: Appendix
|
|
A New Participant Guide - Page by Page
Cover Page

Participant Guide Cover page created with the Light Blue Collection
This screenshot is taken in Word
Word's formatting marks are showing
LeaderGuide Pro turns the formatting marks on
Let's take a closer look at the elements found on a cover page ...

|
Department or Division: Optional - can be deleted Guidebook Type: Also appears in the page headers - can be customized Logo: Customize with your logo Program Name: The course name entered when starting the new guidebook - edit on this page - do not change the Style - can be customized Graphic Design – Each Collection has a different cover page - can be customized - Curriculum or Subject Area – Optional - can be deleted Course ID – Optional - can be deleted - if used, it is a searchable field within File Explorer Page Break – Only visible when Word's formatting marks are on - Do not delete this page break |
The Acknowledgements Page
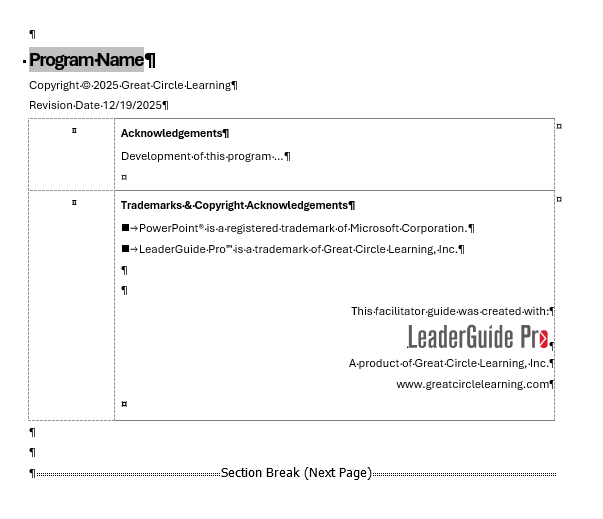
This page appears right after the Cover page in both the facilitator guide and the participant guide - can be customized
The Acknowledgements page contains:
|
|
The Program Name: Repeats from the Cover page at the top of this page
Copyright and Revision Date: This information repeats in odd numbered page footers - Do not delete or change the styles
Acknowledgements: Acknowledge Program Contributors or use this space as need – this is a table row Trademarks & Copyright Acknowledgements: Placeholder for copyrights of materials from other sources, legal notices and contact information - this is a table row Section Break: Do not delete - this only shows on the screen when Word's formatting marks are on |
Table of Contents

The Table of Contents (TOC) builds automatically and appears right after the Acknowledgements page in both a facilitator guide and a participant guide
The initial TOC will list the Modules and Lessons from the Guidebook Design Template entered as the new document was created
The TOC will automatically flow over to subsequent pages as additional Modules and Lessons are added
Do not type on the Table of Contents page
- Edit Module or Lesson names on the first page of a Module or Lesson and then click Update All Fields on the LeaderGuide Pro ribbon
- The TOC will update any time you click Update All Fields
Beginning on the Table of Contents page
The TOC ends with a Section Break – Only visible when Word's formatting marks are on - Do not delete this section break
- Headers will show the guidebook type and the Module you are in
- Footers will start showing page numbers that update automatically as you add content, as well as
- the Copyright and Revision date info on odd numbered pages
- the course name on even numbered pages
Overview: Purpose

New page without content |

New page with a Content Block |
The Overview: Purpose page is only in a Participant Guide
This page provides information about
- why this training program is being offered
- and how the participants will benefit
If you start a new Participant Guide using the New button on the LeaderGuide Pro ribbon
- Place your cursor by the paragraph mark immediately below the lesson name, Purpose, and insert a Highlight Content Block
If you extract a Participant Guide from a Facilitator Guide
- A Highlight Content Block is added immediately below "Purpose"
- And the text that is entered into the "Why a Program Name program?" placeholder on the Program in Perspective page of a Facilitator Guide is copied over and pasted in - the idea being that it can be edited to suit the participants
You can add additional Content Blocks to this page
Do not delete the page break
Overview: Learning Objectives

New page without content |

New page with a Content Block |
The Learning Objectives page is only in a Participant Guide
The Learning Objectives page:
- Lists what the participants will be able to do upon completion of this training program
If you start a new Participant Guide using the New button on the LeaderGuide Pro ribbon
- Place your cursor by the paragraph mark immediately below the lesson name, Learning Objectives, and insert an "Objective" Content Block
If you extract a Participant Guide from a Facilitator Guide
You can add additional Content Blocks to this page - such as a placeholder for participants to note what they hope to learn
- An Objective Content Block is added immediately below the Lesson name
- And the text that is entered into the "Learning Objectives" placeholder on the Program in Perspective page of a Facilitator Guide is copied over and pasted in
Do not delete the page break
Modules and Lessons

Introduction Module - Welcome Lesson without content |

Introduction Module - Welcome Lesson with Content Blocks |
Example of a new Module and Lesson in a Participant Guide
In a Participant Guide:
- Module Names appear at the top of the first page of each new Module
- Lesson Names appear immediately below the Module Name
- As a Lesson flows over to subsequent pages, the Lesson Name is carried over at the top of the page and the Module Name is in the Header
Section Breaks and Page Breaks
- Section breaks appear on the last page of a Module - do not delete them
- Page breaks appear on the last page of Lesson before the start of a new Lesson - do not delete them
Content Blocks
- Content Blocks are used to build the Lesson pages - insert Content Blocks from the LeaderGuide Guide Pro ribbon
- If you extract a Participant Guide from a Facilitator Guide you will choose which Content Block types to bring over into your Participant Guide and your Lesson pages will be populated
The last page of a Participant Guide

At the end of the last page of a Participant Guide:
- you will see non-printing red text - as long as Word's formatting marks are on
- and this MUST remain the very last thing in your guidebook
Do not delete or type in the red text
Learn More